- +33 (1) 41 31 82 82
- Send us an email
- Support Center
AscentialTest - Getting Started Guide
Thank you for choosing to evaluate AscentialTest. The purpose of this guide is to provide a framework to help you learn the basic features of AscentialTest.
It is intended to serve as a supplement to the self-guided video tutorials.
Please contact Novalys Support at ascentialtest@novalys.net if you have any questions during your evaluation.
Preliminaries
Make sure that your computer display settings are set to 100%. This is usually labeled as ‘smaller – 100% (default)’ on Windows 7 and simply ‘100%’ on Windows 10.
How to Use AscentialTest
There isn’t only one way to use a testing tool and that is certainly true of AscentialTest. This guide provides steps to follow so that the user will learn the primary features in a logical order. It is not intended to be comprehensive. In fact, it is purposely kept simple to teach only the basics. The product documentation is available with all of the details once basic skills have been mastered.
This guide follows the same usage path as the self-guided video tutorial. It explains the purpose and general usage for each of the following activities:
- Create a project
- Plan tests
- Define application objects
- Manage application start-up
- Create steps
- Build tests
- Organize tests
- Run tests
- Report test results
Create a Project
Creating a project is the first task that you will complete when you begin using AscentialTest.
Basic Steps
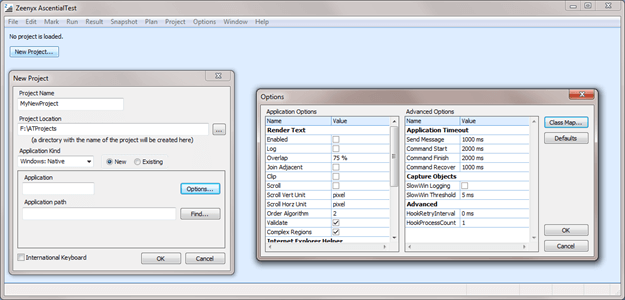
- Select ‘Project New’ from the AscentialTest canvas or the File menu.
- Provide a name and file location for the project.
- Select the ‘Application Kind’.
- The New Project dialog will prompt for information needed to create and configure your application profile.
Notes:
- For target applications other than web or terminal, the ‘Application’ field is used to create the Application Profile Name. It is typically the name of the target application or some abbreviation of it. The name itself does not matter as long as you recognize it as being associated with the target application.
- There are other options that can be configured from the New Project dialog by clicking the ‘Options’ button, but it is best to use the defaults until you become more familiar with AscentialTest.
- The New Project wizard located below the AscentialTest Main Menu prompts the user to configure the target computer. Here are some examples:

Notice that the alerts include links to assist the user with making the necessary configuration changes. Should you have any questions, please contact ascentialtest@novalys.net for assistance. - The New Project wizard then prompts the new user to take a first snapshot:

If you are unable to get a snapshot of your application, it is likely that your application profile has not been properly configured. Don’t spin your wheels. Contact ascentialtest@novalys.net for assistance.
The wizard also prompts the user to define App Objects by dragging from the Snapshot to App Object panel:

and, for non-web applications, to create an App State:

Beginning with AscentialTest 9.5, the initial appstate for web-based applications is automatically created by AscentialTest through the New Project dialog.
Plan Tests
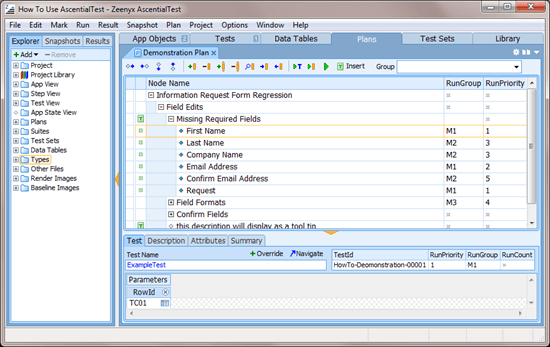
We recognize that not every organization writes test plans so we provide two very different ways of using the Test Plan Editor. For those of you that do write test plans, you can choose to write a structured outline like the one pictured in Figure 2 below or you can simply create a list of test descriptions. The text that you provide for those descriptions can be just a few words or you can write an entire story. It’s completely up to you. For those who do not write test plans, we provide an alternative mode where the test plan becomes a container to organize tests so that they can be executed together.
Basic Steps
- Right-click on ‘Plans’ in the Project Explorer to add a new plan.
- Provide a name for the new plan.
- Add test descriptions:
- In the default mode, called ‘Update’, input test descriptions. You can format your descriptions as a list, an outline (like the one pictured above in Figure 2) or as a list of scenarios or use cases.
- Or in the alternate ‘Input’ mode, just leave the test plan area blank for now. We’ll revisit it later in this document.
Note: To switch between ‘Update’ and ‘Input’ mode use the  /
/  button in the toolbar.
Define Application Objects (App Objects)
AscentialTest is an object-oriented testing tool. By defining objects and referring to them by name, tests are insulated from changes in the target application, reducing the amount of work required to keep tests up to date. When there are changes to the GUI of the target application, you can make changes to the object definitions without having to change any of your tests. App Objects provide a single point of change.
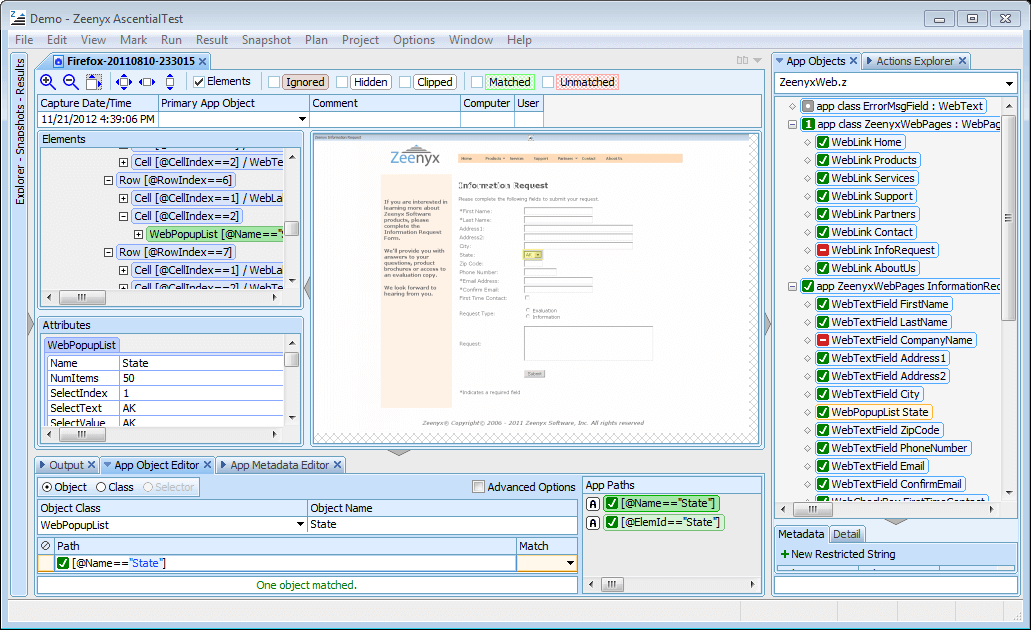
‘Snapshots’ are central to the process of defining objects. Snapshots are smart images that contain an image of a page or screen along with all of the contained objects and their attributes. The process of defining App Objects is through drag and drop. It’s easy to do and AscentialTest provides plenty of feedback so that you can be assured that objects are being uniquely identified. Once a page or screen has been defined, you will continue to use that definition over a long period of time. You only need to modify the definition if there are changes to the application objects.
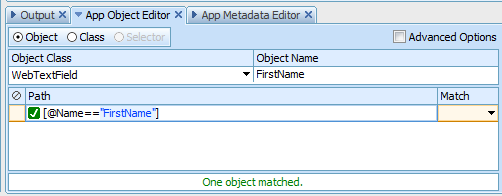
The Snapshot Viewer panels in Figure 3 combine with the App Object Editor in Figure 4 to provide a way to define application objects such as ComboBoxes, PushButtons and TextFields via a drag and drop interface.
Basic Steps
- Take a snapshot for each page or screen in the test that you plan to create.
- To take a snapshot, point the mouse in the middle of the target page or screen, hold down either <Ctrl> key and press either <Shift> keys. You will see a flash and hear the sound of a camera shutter.
- Create a Snapshot Series that includes all of the snapshots needed to build your selected test or group of tests.
- To create a Snapshot Series, right-click on ‘Series’ in the Snapshots tab of the Project Explorer and provide a series name. Drag the snapshot thumbnails from either the Date or App Object View to the ‘filmstrip’ area at the top of the Series workspace.
- Define application objects by dragging from the snapshot image to the App Objects panel located to the right.
- Define the page or screen by pressing the mouse on the caption and dragging to the App Objects panel.
- Repeat the process for each object to be defined.
- As an alternative, you can press the mouse on the ‘All’ button if it displays at the top of the Snapshot Image and drag it to define all of the objects contained on the screen or page.
- AscentialTest usually selects the best path for each object. Occasionally, the user may need to select an alternate path from the ‘App Paths’ panel.
- Repeat the process of defining objects for each snapshot in the series.
Notes:
- To take a snapshot, you must have the proper application profile enabled. If you are unable to take a snapshot, please contact ascentialtest@novalys.net.
- If you are testing a web page and it contains a table, please watch the video on using the table definition wizard.
- You have probably already realized that the green checkmark indicates that the object is uniquely defined. A red rectangle indicates that there is not match for the object definition in the currently loaded snapshot. It does not indicate an error.
Manage Application Startup
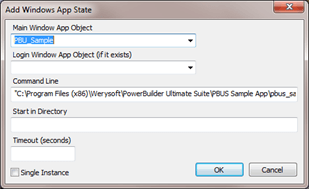
Establishing a ‘base state’ from which tests start and stop is good test design. It helps ensure that a test failure will not put the target application in a ‘bad state’, where subsequent tests cannot be successfully run. AscentialTest provides App States for this purpose. An App State can be created to make sure that the target application has been started and is in a ‘ready state’ for running tests. The Project New wizard automatically captures information required to create a Web App State. But additional app states can be created if required:
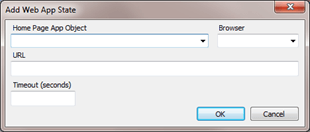
The New Project wizard prompts the user to create an app state, but additional app states can be defined using the Windows App State dialog:
Basic Steps:
- Open the Snapshot of your main page or window.
- If you have not already done so, create a definition for that page or window.
- Right-click on the App States in the Project Explorer and select the appropriate App State Wizard.
- Complete the dialog that captures the information necessary to configure the new App State.
- A new tab will open to display the AppState. Edit the AppState if necessary and then click ‘Save’.
- New tests will automatically be based on the new App State.
- If you are testing a web-based application, it’s a good idea to set your browser home page to ‘about:blank’ so that a heavy page will not be the first to load.
Create Steps
To get an understanding of how tests are constructed in AscentialTest, a few definitions are needed:
- A Test is an ordered series of Steps
- A Step is an ordered series of Actions
- An Action is generally a ‘set’, ‘get’, ‘verify’ or ‘event’ acted upon an application object. An example of an action is a ‘click’ on a button.
It’s important to understand that steps are intended to be reusable. Once created, a step can be used in tens, hundreds or thousands of tests. If there is a change to the target application, you only need to update the impacted step. All of the tests that use that step are automatically updated. This is one of the ways that AscentialTest reduces the level of effort to keep tests up to date as the target application changes.
The Step Editor provides a way to build sophisticated automated tests by dragging and dropping from snapshots. Actions are automatically generated when the user drags an object/action to a test step. The Step Editor combines the best features of 'recorder-based' and 'script-based' approaches. It is as easy to use as a recorder, but it provides much more control and flexibility.
The image in Figure 6 below displays the Step Editor with a snapshot loaded and a step with two actions that have been dragged from the snapshot.
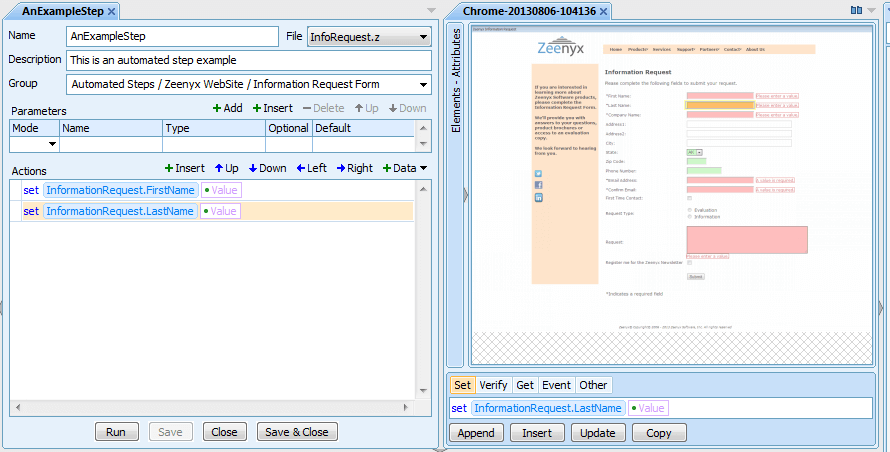
Notice the panel below the Snapshot Image. We refer to that panel as the Action Builder as it provides a way to generate actions by selecting from dropdowns.
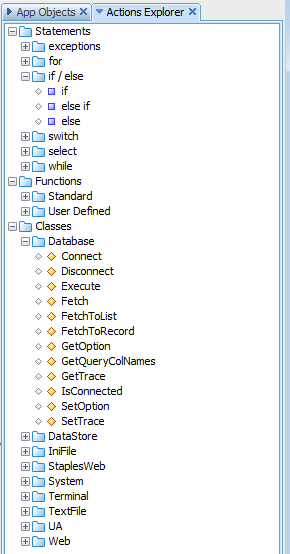
The Actions Explorer, pictured in Figure 7, provides the ability to drag and drop variables, control statements, functions and methods into steps.
Basic Steps:
- Right-click on the on ‘Steps’ in the Project Explorer to add a new step.
- Complete the header information at the top of the step including Name, Description and Group.
- Open your snapshot series so that the snapshot is positioned to the right of the Step Editor.
- Using the Actions Panel to add actions to your step: select the object in the snapshot image, select an action type (set, verify, get, event, other), select and action and then either drag then click the ‘Append’ or ‘Insert’ buttons.
- If you are testing a web-based application, use ‘Navigate’ instead of ‘Click’ if the link or button will cause a new page to load. You might also include a ‘WaitUntilExists’ action if you need to add synchronization to your step.
- Since the steps are intended to be reusable, consider using the ‘Add Parameters’ feature instead specifying the test data directly in your steps.
- The steps are accessible from the Steps section of the Project Explorer.
- Each step can be tested independently using the ‘Run’ button at the bottom of the Step Editor. Make sure the target application is in the proper context since the AppState is only called when running a ‘Test’.
Build Tests
The process of building tests in AscentialTest is quick and easy. Tests are formed by dragging steps together in sequences and then providing the test data.
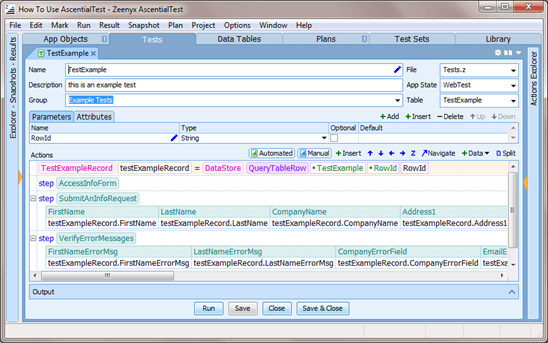
The image in Figure 8 above displays a test comprised of three reusable steps that were dragged from the Project Explorer. The data objects were automatically generated from Step parameters. The fields in these data objects can be used to generate a data table to store the test data. This test has already been bound to a data table.
Basic Steps:
- Right-click on the on ‘Tests’ in the Project Explorer to add a new test.
- Complete the header information at the top of the test including Name, Description and Group. Select your app from the ‘App State’ dropdown if it is not already displayed.
- Drag steps from the ‘Steps’ section of the Project Explorer into the Test Editor. You can reorder them by using the Up and Down Arrow icons in the tool bar.
- Highlight all the steps and select ‘Bind Data Table’ from the Data button on the tool bar.
- Provide a name for the newly generated Data Table.
- Input the test data.
- You can use the ‘Run’ button at the bottom of the Test Editor to run your test.
Organize Tests
AscentialTest provides several layers of organization for managing your tests. To get an understanding of how tests are organized in AscentialTest, a few definitions are needed:
- A Test Plan is a container for tests.
- A Test Suite provides a way to group multiple plans together.
- A Test Set is comprised of Test Plans and Test Suites. It is used when you are ready to track and report on the results of your tests.
Test plans and suites provide ways to group and organize tests for execution. When tests are run directly from a plan or suite, results are presented in a results viewer with ‘Summary’ and ‘Output’ tabs. Users typically run tests in this way in the development phase of test automation.
Test Sets provide test execution management and reporting to support your software testing cycles and releases. A Test Set may be created for a build, a test cycle or a project, depending upon how your organization tests and delivers software.
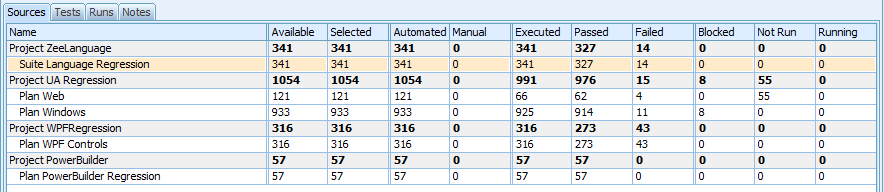
Each Test Set contains an Overview which provides a real-time status:

Basic Steps:
- If you have written a test plan, drag tests from the ‘Tests’ section of the Project Explorer to the appropriate test description in the Test Plan Editor configured to ‘Update’ mode.
- If you have not written a test plan, switch the test plan mode from ‘Update’ to ‘Input’ using the / button in the toolbar and drag tests over to the empty test plan nodes. Depending on your project settings, either the Test Name or Test Description will display. A small green ‘T’ icon will display to the left. You can configure whether the Test Name or Test Description Displays in the Project Settings ‘Other’ tab which can be accessed from the Main Menu>Project>Settings menu item.
- Repeat this process until you have grouped your Tests into Test Plans.
- To create a Test Suite, right-click on ‘Suites’ in the Project Explorer and a new Suite.
- To add Test Plans to the Suite, simply drag and drop the Test Plans on the Suite.
- To add a new Test Set, right-click on ‘Test Sets’ in the Project Explorer and add a new Test Set. Using the checkboxes, select the Plans and Suites to include in your new Test Set.
Run Tests
There are two ways to run tests from within AscentialTest. Typically when users are in the test development phase, they run tests to verify that there are no test errors. In other words, this is the phase where you test your tests. Tests are run directly from Test Plans and Suites in this phase because the results will not be stored and reported upon. The easiest way to run tests from Plans and Suites is to use the marking bar, located to the left of the test plan nodes and the tool bar located above the list of tests:

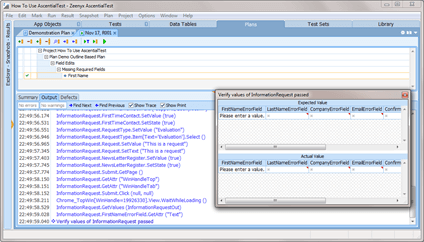
Upon test completion, a results file is generated that provides a full trace of each test so that you can determine whether or not the tests have run as expected.
When you are ready to store and report upon the results of your tests, you will want to run from a Test Set. The marking bar and tool bar are also available for selecting tests to run. You might also want to familiarize yourself with the ‘Mark by Query’ mechanism to locate tests based on their attributes. Please see the Help for details.
Basic Steps:
- Open your Test Plan, Test Suite or Test Set from the Project Explorer.
- Select tests by clicking on the marking bar to the left of the test name or description or by executing an attribute query.
- Use the appropriate ‘run’ icon to execute the selected tests.
Note: Tests can also be run from the command line or from Continuous Integration Solutions like Jenkins.
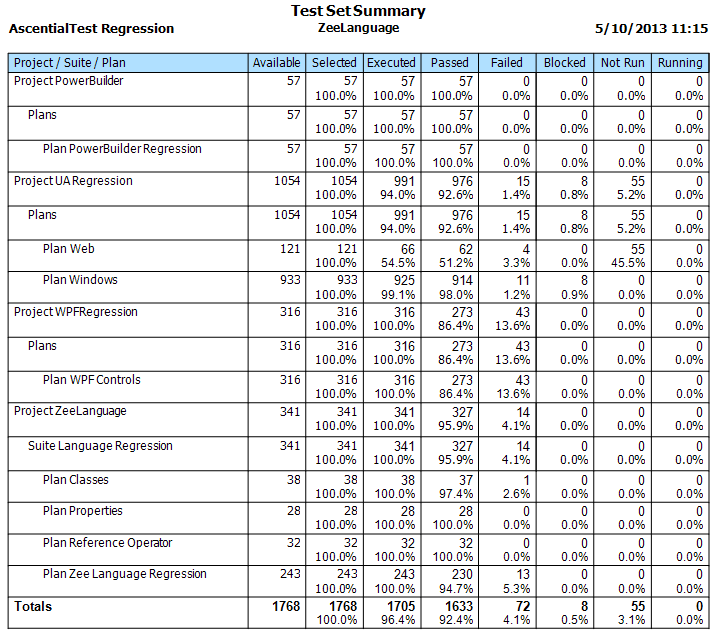
Report Test Results
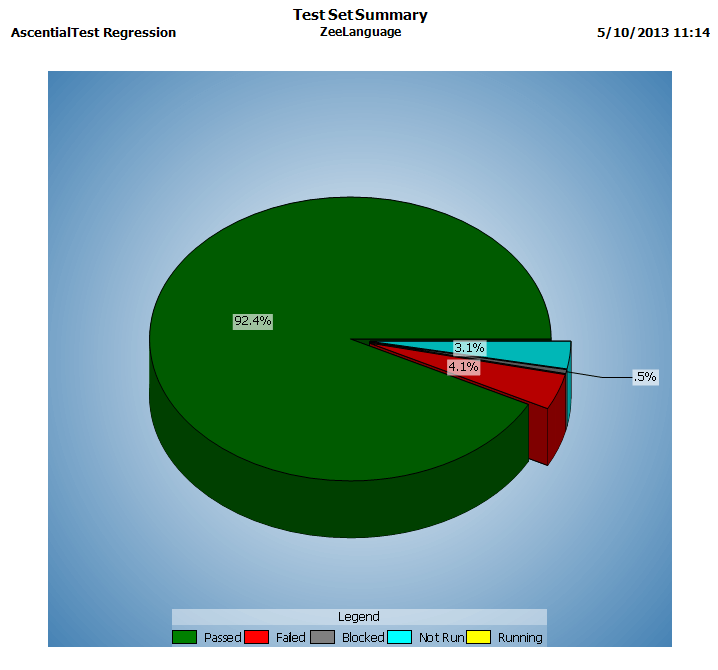
AscentialTest provides several options for generating, publishing and distributing reports. You can select from a set of pre-defined reports and charts or create your own custom reports. Standard reports can be generated from AscentialTest or from a browser based portal (Enterprise Edition). Reports run from AscentialTest can be exported into many popular formats including PDF, HTML, EXCEL, RTF, TXT or TIF.
Below are samples of reports that can be generated from a Test Set:
For more details on the topics covered in this document, please download the AscentialTest Evaluation Guide which is a set of video tutorials. You will have received a download link along with your evaluation license file.
AscentialTest is a feature rich, comprehensive testing solution. We’ve only scratched the surface here. Now that you understand the basics, you can explore further by accessing the product Help and our AscentialTest YouTube channel
Please contact us at ascentialtest@novalys.net if you have any questions during your evaluation.